Crochet / Weaving-in-the-ends-as-you-go, with loops / Semi-weaving in / Cardigan4
https://www.facebook.com/berta.mayer.33/posts/7173795789361401
Cardigan Projekt-in-the-making No. 4 / Variation of crochet #brickworkpattern / learn how to crochet #Freestyle / Blog No. 4/N
————————————
a)Weave-in-as-you-go with loops in crochet, for slippery yarn
b)Semi-Weaving-in-as-you-go at the edges, for every kind of yarn
(in case you work with a new thread in every row, from right to left, or at any colour change at the edges)
—————————————
—————————————
a) Weave-in-as-you-go with loops
If you work with very slippery yarn be sure to leave a longer tail than usually.
On the right edge, it’s done with the tail you just left - do some normal weave-in stitches, then fold back the loose end following pictures 1) - 13)
On the left edge, done with the tail of the row before, see pictures 14) - 19)
--
Method NOT suited for thick, smooth and very solid yarns.
I’ve used one of these, a 3-ply cotton where each of the 3 plys is 4-ply - the worst of the worst generally (merciless in showing any mistake) and in this technique, because it thickens the stitches where the tail is woven in considerably - to show the exaggerated effect. See picture 30), bottom half of the swatch
This effect will be visible in other yarn qualities, too. The more plushy and variegated the yarn is, the less this disturbs the surface.
The tighter your stitches are, the more visible the effect - semi tight stitches hide it best, and very slippery yarn (like viscose silk) in loose handling tends to slip out anyways.
—
You can, though, use this method to purposefully thicken the fabric,
even someplace not at the edges, with a piece of yarn worked in instead of the tail ends. Ok for working front and back rows with one continuous thread, too, you just have to take care to do it in front of your work while doing back rows. (as opposed to working groups of stitches with a doubled up yarn, which will be bulkier and eventually even create a bubble).
For a visually distinctive thickness all the weaving-ins begin and end with the same stitch of the rows below.
If, on the contrary, you want to produce a gradual integration less noticeable, change the last (right side) or first (left side) weaving-in-stitch in every row, then go back.
For example: stitch 6 in row 1/stitch 7 in row 2/stitch 8 in row 3/stitch 7 in row 4/stitch 6 in row 5, and up again…..
On the left edge, the stitch count will be from left.
—
NOT SUITED if you work double-face, as it clearly can be seen on the back
————————————
———————————————————————————
To be on the sure side with slippery yarn, do your weaving in with a pointy needle large enough to accommodate your yarn, first chain and then back stitches, on the back side of the fabric, trying to get inside the yarn for a better grip.
Of course you can combine both methods.
———————————————————————————
————————————
b) Semi-weaving-in-as-you go at the edges
Weaving in only into the first and last stitch you do in every row, then again in the next row and so on
————————
right edge: done with the tail of your current row, plus the ones of some rows below, in every new row omitting the last tail down. Can explain it better with an example:
in the first row you work in the tail of your row in the first stitch (or, if your edge stitch consists of cain and one stitch, in the latter one)
in the second row you work in the tail of the 2nd row doubled up with the tail of the first row
in the third row you work in the tail of the 3rd row tripled up with the tails of row 1 and 2
in the fourth row you work in the tail of the 4th row quadrupled up with tails of row 1,2 and 3
and so on, as long as your edge does not appear too bulky for your taste. When this happens, you drop the tail of the 1st row, in the next row you drop the tail of the 2nd row and keep the 1st dropped, in the next row drop the one of the 3rd row, keeping the 1st and 2nd dropped, too.
If you always leave the tails the same length, you can easily see which one you carried the longest.
In case you mange to weave in a decent number of tails (from 5 on) and your yarn is not slippery, you then can cut the rest of the tail.
See pictures 20) to 29)
Slippery yarn = you have to weave in the remaining tail with a needle, too.
Or with a smaller hook, making one chain-weaving in, making another chain-weaving in etc.
————————
left edge
do the same as right, only the tails will be those of the rows below
————————
————————-
I don’t really bother to weave in the ends or care too much which kind of edge I make, except when I want to leave the edges as they are, without further finishing them. Frequently they are sewn together anyway ;-)
If I leave the fringes to use them as a design element, I use method Rb and Lb (making a very tight chain stitch), described in Blogs 4/K and 4/L
#crochet #masterclass #crochetdesign #crochetinspiration #crochettechnique #crochettutorial #crocheting #Cardigan4 #crochetaddict #crochetfashion #crochetlove #crochetidea #crochetproject #yarnaddict #yarn #craft #yarnlove #crochetpattern #mohairyarn
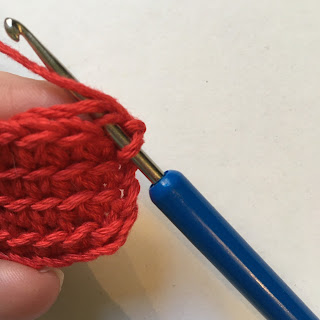


13) cut tail


30) in the swatch you note: the lower rows, with the loop weave-in, are bulky with this sturdy yarn, slightly less with softer yarn. The upper rows are the ones with the semi-weave in: there is a very slight bulkiness. Note: the edges look different depending on the method you choose. I used method Rb as described in Blog 4/K and Lb described in Blog 4/L
No comments:
Post a Comment